Thursday, April 8, 2010

Saturday, November 14, 2009

Holly Jolly Days of Christmas

If you're looking for some time to do your Christmas shopping & holiday preparations...bring your kids to the Holly Jolly Days of Christmas. Sign ups are per day...not monthly.  Let me know if you're interested!


Friday, November 13, 2009

Fairy Wands


For Fairy Day, we read the story "Alice the Fairy". Then we made these fairy wands. I ordered them from Oriental trading, unfortunately they were a little flimsy so we had to glue two together. I got out the glitter, markers, flowers, & ribbons and let the girls go to town! I think they really liked how they turned out.  I am learning that when it comes to little kids, things don't always turn out how I picture them, especially when someone wants an orange & black wand.  But that's okay...I'm so glad the kids are having fun!


PINKALICIOUS

All girly girls love pink!


After we read Pinkalicious, we decorated pink cupcakes to look like the ones in the story.

Saturday, October 31, 2009

Friday, October 2, 2009

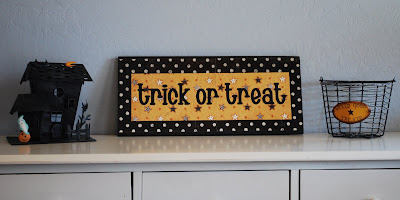
Trick or Treat Sign


Last year my sister & I made these charming trick or treat signs.  It was a little "tricky" to make and it didn't turn out perfect... but I love having it on display in October. 
SUPPLIES:
1. 1/2" or 3/4"pine board or other craft board-mine was 22" wide by 10" (actual height 9.25")
2. Craft paint to match your paper
3. 4 sheets of 12x12 scrapbook paper-2 of each pattern
4. Vinyl letters or die cut letters
5. Modge podge
6. Paper Trimmer

STEPS:
1.  First you need to paint the board and let it dry thoroughly
2.  Cut your outer paper to fit the board, then carefully line up the seams--you may want to use a pencil to mark the spot to keep it lined up--then modge podge the paper on.  Let it dry thoroughly.
2.  Decide how big you want your inner paper to be--make sure to leave enough room for your lettering--carefully center the paper and line up the seams--then modge podge on. Let it dry!
3.  Once it's completely dry you can center your lettering onto the sign. I like to modge podge over the entire thing about 3 times to give it nice smooth finish.  Be sure to let it dry 10-15 mins between each coat.  And there you have it...a charming accent to your halloween decor. 


FISH BLOCKS

I
 I made these fun blocks to go in Ridge's bedroom.  His room is "fish themed" and the colors are navy, lime green, & orange.   These cute blocks sit on his dresser and they add such a lively touch to the room!  These blocks are made from 4x6's and range from 6" to 8" tall.  I wanted them to look a little rustic so I chose distressed scrapbook paper & roughed up the edes.  Ridge's favorite color is green so he loves them!

Monday, September 28, 2009

Dinosaur Day-Boys Will Be Boys


Our Dinosaur Day was great!  We read some of my favorite books..."How Do Dinosaurs Say Goodnight", "How Do Dinosaurs Go to School", "How Do Dinosaurs Get Well Soon" written by Jane Yolen & Mark Teague.  These stories are perfect for preschoolers.  Using dinosaurs and a lot of silliness, they teach some great lessons on how we should and shouldn't behave.  Then we looked at a book with pictures of "real" dinosaurs and talked about what they were like.  While the kids were playing with toys, I hid several small dinosaurs around the room.  Then they went on a dinosaur hunt.  The kids loved this so much we could have played all day.  They each took turns hiding the dinosaurs and letting the other boys find them.  For our craft we made this "shape-a-saurus".  I found the template for it on allkidsnetwork.com in the craft section.  I provided the cut out shapes and the kids were able to glue these together all by themselves.  Then they each got to wear one of these fun dinosaur hats home.  I found them at Dollar Tree, of course.

I Love to Twirl-Easy Tutus


This was one of my favorite Girly Girls classes.  We read this story called "I Wear My Tutu Everywhere"  by Wendy Lewison.  It is an adorable story about a little girl who wants to wear her tutu all the time...everywhere she goes.  I think many moms can relate.  Then we made these tutus.  They were so easy & super fun to make.  I had pom poms, flowers, butterflies, ribbon, & stick on felt hearts.  I let the girls decorate them however they wanted.  Of course I had to hot glue eveything on for them, but they showed me where to put it.  They turned out darling!!  The girls loved it!  I don't know how well they are holding up...I'm sure they've lost a pom pom or two!  After they decorated their tutus I put on the Bella Dancerella DVD and they all danced to their hearts content. 


Most of you probably already know how to make these tutus, but here's the how to just incase you're interested!
How to make super easy tutus
Items Needed:
1/2 to 1 spool of tulle-you can do all one color or mix colors whatever you prefer.  Make sure to buy it on sale or use your coupon!  They have lots of colors to choose from at Hobby Lobby (fabric section) or Joann's (wedding section).
Elastic headbands- You can get 6 for $1.00 at Dollar Tree
Hot Glue Gun
Flowers, Ribbon, Felt Shapes, Pom Poms, String of Beads, Jewels, Etc-Whatever you want to use to decorate it OR you can just leave it plain.
STEP 1:  Cut several strips of tulle-I cut them to be 24" long, but if you want a longer tutu you can make the strips longer.  I used 18 strips (about 1/2 spool of tulle) on mine because I was trying to do it as inexpensively as possible.  For a fuller tutu you may want to use a full spool of tulle.  This just depends on how fluffy you want it to be! 
STEP 2:  Take your elastic headband and tulle.  Fold your piece of tulle in half then tie onto the elastic band leaving two equal lengths of tulle hanging down.  Continue tying pieces equally spaced on the elastic until it's full.  If you want to you can alternate a few different colors of tulle in any pattern you want. 
STEP 3:  Once you're done tying the tulle on you are ready to decorate!  I like to tie a few pieces of ribbon right in the front and let them dangle just a little shorter than the tutu and then hot glue a big flower in the center.  Then you can continue hot gluing whatever you would like onto the tutu or tie ribbons on. This is where you get to be creative!! 
Another Variation:  Instead of tulle you can tie ribbons onto the elastic.  These are darling, but a little more expensive. 
I know there are many ways to make these, but this is how I did it.  Hope these directions make sense.  Let me know if you have any questions.

Wednesday, September 16, 2009

I am a Superhero!

At the open house the boys made these batman name tags to wear on their first day to class. These were so simple to make and a huge hit with the boys.
How to make these necklaces:
Cut a yellow oval and a simple bat shape out of black craft foam. Glue the bat onto the oval and let it dry (I let the kids glue them on). Then punch two holes in the top and use yarn to tie around their neck.
These were sooo inexpensive to make. The foam works much better than cardstock or construction paper because it holds up a lot better. These would be super fun to have for a Batman themed birthday party. Or you could make them using a million other shapes!
For the girly girlys class we made crown necklace/nametags. I cut simple crown shapes out of pink craft foam and let them decorate them with jewels. Just make sure to allow enough time for the jewels to dry. I learned that the hard way! Anyway, also a fun & easy idea for a princess birthday party!

KAPOW!

The first boys class was called I am a Superhero...we talked about what makes someone a hero. I used this to help establish some rules for our class...superheroes help each other, superheroes share, superheroes follow the rules, etc. Since they all want to be superheroes it was easy to help them learn how they should behave in class-like superheroes! Anyway, for a craft that day we decorated these masks. These are super cheap from Oriental Trading...I so love their stuff!

For the first Girly Girls class we followed a similar idea...it was called I'm a Princess and we talked about how princesses act. Then used these ideas to establish rules in a similar way as the boys class. Princesses always speak nicely to each other, princesses share their toys, etc. Of course I don't expect them to be perfect, but it seems to work pretty well when I say, now is that how a princess acts? What do you think a princess would do? The girls decorated crowns also from Oriental Trading. Fun times!

Girly Girls & Boys Will Be Boys classes

SOOOO....I know I haven't blogged since July....but that's because I have been busy with another project! I just started teaching these super fun classes for preschool aged kids. One of the classes is called Girly Girls and the classes are based on themes that little girls love like princesses, fairies, twirling, etc. The other class I'm doing is Boys Will Be Boys based on themes that are perfect for little boys who just want to romp and play...superheroes, dinosaurs, pirates, dragons, etc. Today I finished up my third week and the classes are going great! The kids are so adorable and love the games and activities we've been doing. It was really hard for me to put myself out there and start these classes, I didn't know if anyone would be interested...but I'm so glad I did! Things are going great! I am going to try to post some of the fun little crafts we do-they are super easy, anyone can make them.

New Blog Name

For those of you who have been following my little letter shop blog...I am now doing a different blog to incorporate my vinyl lettering projects, some of the crafts we do at my little classes, & who know what else! Just a little bit of everything I guess! I know I don't have many followers- there are so many way awesomer (is that a word?) blogs out there- but hey this is mainly just fun for me!!